

TECHNICAL INSTRUCTIONS FOR WALL TILE INSTALLATION
A white wall is too boring, monotonous and will peel off easily, so you need to protect that wall from stains, damage, especially to increase aesthetics and luxury. At that time, the need for tiles and wall tiling becomes more necessary. Wall tiling is a popular surface finishing method in construction, not only bringing aesthetics but also protecting the wall surface from moisture, dirt and damage. To achieve the best results, tiling construction must comply with certain processes and techniques. This article will guide you through the necessary steps to effectively tile the wall.

1. Some notes when choosing wall tiles
- In terms of color, you can base on surrounding factors such as: feng shui factors, area, floor tile color, ceiling color and room area to bring a perfect, highly effective space to the house. If the house has a small area, you should choose light-colored wall tiles to help the room feel more spacious and comfortable thanks to the tile color
- Choose the type of tile suitable for each space and each architectural style. For example, the living room, bedroom, kitchen, and bathroom will choose different types of suitable tiles, as well as modern, classic, and classical architecture will also have different tile choices, but the way of tiling the wall in each space is not much different. And of course, you can choose to tile the wall in a certain space, such as only tiling in the living room space, then you can apply the way of tiling the living room wall with the things we provide.
- Choose wall tiles, pay attention to feng shui issues, choose colors that match the homeowner's destiny.
2. Instructions on how to tile walls correctly and simply
Step 1: Prepare necessary materials
- Visit the building materials and interior and exterior decoration store to choose the types of tiles you like such as ceramic tiles, granite, ceramic wall tiles, marble, natural stone wall tiles, etc. Tiles and stones must be of the right quality, according to the specifications, not cracked, and retain the pattern lines. This is the way to tile the wall with good preparation and ensure quality during construction.
- Construction tools include trowels, levelers or mortar buckets, clean rags or sponges to clean tiles, rulers, tile cutters, measuring lines, etc.
- The commonly used tile mortar is oil mortar or also known as tile adhesive. Oil mortar is mixed with pure cement mixed with water, we can also mix 5% lime mortar compared to the volume of cement to create the flexibility of the mortar.
- Remove the concave and convex areas on the wall surface that needs to be tiled, add mortar to the concave areas to ensure a flat surface.
- Check the floor level, the flatness of the wall to be tiled, and fix it by applying cement mortar.
Before tiling, apply a layer of cement mortar at a ratio of 1:3 by volume. Small bricks are attached directly to the wall, if heavier, there must be an iron hook to anchor to the wall. The tiling surface must be flat, the bricks must be tightly attached to the wall, the joints must be straight and even, and the joints must be small in width. When tiling, tiling from the bottom up, filling each row with mortar, when tiling 3 to 4 bricks, use a level to check if they are not flat, tap the level lightly to create flatness.
Before tiling the entire row, tiling the vertical rows on both sides of the wall corner as a reference for the entire horizontal row so that tiling on the wall is effective. After tiling the entire joint, mix cement water to wipe the joint. After tiling, leave the tiling surface for about 10 days to make it really solid; use a cloth to polish the surface, use a flat bamboo stick to scrape off the mortar stains on the wall.
Step 2: Align the tiled wall edges
This is a very important step to ensure that this method of tiling on the wall does not have aesthetic errors. Fix a straight horizontal wooden bar to measure the bottom edge of the tile. If there is no height restriction, the distance from the top edge of the wooden bar to the floor should be equal to the height of the tile. Start measuring from the edge of the wooden bar up according to the height of each row of tiles. Use a pencil to mark the joints of the tiles so that they are balanced. Use a level to align the horizontal line and use a plumb line to align the vertical line. By marking in advance, we can calculate the number of tiles consumed. In case the positions at the edge are larger than half a tile, they are counted as one tile.
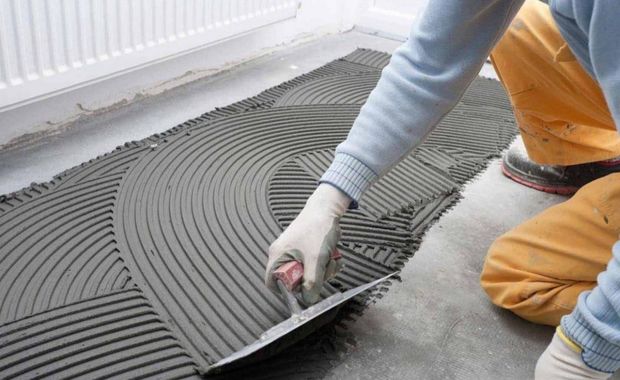
Step 3: Apply mortar or tile adhesive to the wall
Apply mortar to the wall in sections about half a square meter in size, starting at the chosen starting point. Use a wavy-shaped trowel or trowel to create waves in the mortar. As you lay the first tile, press the tile down gently until the mortar begins to rise into the joint.
Step 4: Proceed to tile using tile spacers
This is the most important step in the way of tiling on the wall that we introduce. Grout is often used to determine the distance between two tiles that are close together; and is usually 1mm and 1.5mm thick. Grout has a thickness equal to the distance between two tiles; into the corner and then tiling the next tiles.
When tiling ceramic tiles or natural stone, it should be tiled from the bottom up each row should be filled with mortar; when tiling 3 to 4 tiles, you should use a level to check if it is not straight or flat, tap it lightly on the level to create flatness. Before tiling the whole row, you must tile the vertical rows on both sides of the wall corner to make the whole horizontal row old.

The tiles or small stones will be attached directly to the wall if they are heavier, there must be an iron hook to anchor them to the wall. The tiling surface must be flat, the tiles are tightly attached to the wall, the tile joints are straight and even, and the width of the joints is small.
Step 5: Clean and finish the brick wall
When the mortar is not too dry, you should clean the mortar; along with the tile adhesive on the surface of the tile or the tile's joint.
When the mortar is completely dry, remove the wooden bar. Continue to install the tiles in the bottom row. If there are places that need to be cut, use a tile cutter to cut the tiles; or collect them all and hire a professional to avoid breaking them; wasting tiles.
3. Some notes on how to tile the wall to bring the highest efficiency
- Arrange and tile and stone tiles so that the number of tiles and stones that need to be cut is minimal. If there are windows, calculate so that the edges are as intact as possible; if the tiles are laid on the wall with the right technique and standard alignment, the number of tiles that need to be cut will be limited.
- The surface needs to be carefully prepared: sweep away dust and seal holes in the wall.
- It is possible to tile over the old tile surface, but remember to avoid overlapping joints. This is not recommended because the adhesion between the new mortar layer and the old tile base is not strong.
- If you need to drill and screw on the tile surface; you should use adhesive tape to stick it before drilling to avoid breakage.
- The distance between the tiles is usually about 1 - 2 mm.
Introducing a reputable design & construction consulting service provider
The importance of construction units is undeniable, their reputation will ensure the quality and aesthetics of your project. Currently, there are many units providing design and construction services to meet the increasing construction needs in our country. Therefore, finding a reputable unit is not easy and requires you to spend time researching. In the selection process, you need to research carefully and ensure that the accompanying unit must have high expertise, many years of experience, have a clearly signed contract, transparent costs, ... To help customers save time searching, Hung Nghiep Phu Construction Investment Co., Ltd. is confident that it will be the best choice for you.

Hung Nghiep Phu Construction Investment Co., Ltd. with the mission of providing the best solutions and services, building a prosperous community with customers, Hung Nghiep Phu is gradually affirming its brand through sincere cooperation, with a leadership team with ethical capacity, creativity, high expertise and strategic vision. Hung Nghiep Phu owns a team of skilled, highly qualified employees who will bring customers the best quality technology.
Hung Nghiep Phu Construction Investment Co., Ltd. - specializes in constructing civil and industrial works. We look forward to accompanying customers in construction projects as well as continuous procedures such as planning diagrams, applying for construction permits, completing procedures, applying for fire prevention and fighting certificates, ... If you have any questions or are in need of design, completing procedures, please contact us immediately for free consultation!
>>> See more:
_____________________
CONTACT INFO:
![]() Facebook: Công ty TNHH Đầu tư Xây dựng Hưng Nghiệp Phú (興業富)
Facebook: Công ty TNHH Đầu tư Xây dựng Hưng Nghiệp Phú (興業富)
![]() Hotline: 1800.3368 (Miễn phí)
Hotline: 1800.3368 (Miễn phí)
![]() Website: xaydunghunnghiepphu.com
Website: xaydunghunnghiepphu.com
![]() Gmail: kinhdoanh01@xaydunghungnghiepphu.com
Gmail: kinhdoanh01@xaydunghungnghiepphu.com
![]() Address: No. 2034D, Group 22, Phuoc Thai Hamlet, Tan Khanh Ward, Ho Chi Minh City
Address: No. 2034D, Group 22, Phuoc Thai Hamlet, Tan Khanh Ward, Ho Chi Minh City
------
Source: Compiled from the Internet